
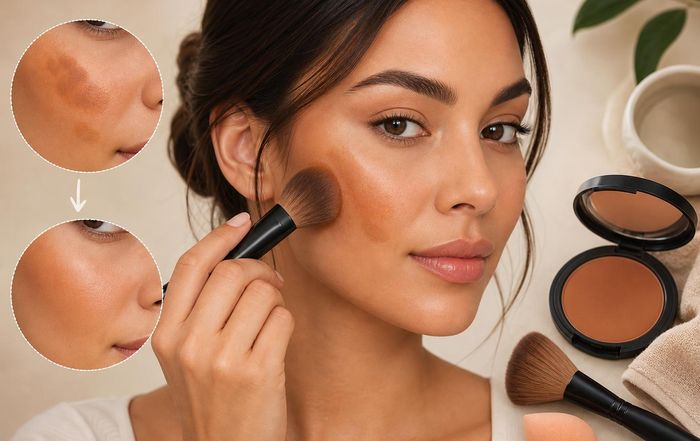
How to Fix Patchy Bronzer Without Starting Over
Patchy bronzer can undo an otherwise polished makeup look in seconds. Instead of removing your base and starting again, it's usually possible to smooth, soften, and rebalance what's already on your skin. The key is understanding why bronzer goes blotchy in the first place and having a few targeted techniques ready to rescue it. This sunny guide walks through practical fixes for different types of patchiness, plus prevention strategies so your bronzer looks seamless and sun-kissed every time.
First: Diagnose Why Your Bronzer Looks Patchy
Before reaching for more product, it helps to understand what went wrong. Most bronzer problems fall into a few categories:
One of the most common causes is an uneven base. If your skincare hasn't fully absorbed, or your foundation is still tacky, powders can cling to some areas and skip others. Likewise, dry or textured patches will grab onto pigment more intensely, making bronzer look darker in those spots. Skin prep and base choice-covered in more detail in our skincare and routines coverage-play a huge role in how smoothly bronzer applies.
Formula mismatch is another frequent culprit. Powder bronzer over very dewy, unset cream products can streak, while cream bronzer over a fully powdered face can drag and lift what's underneath. Using the wrong brush (too dense or too stiff) can leave harsh edges, especially with very pigmented or matte formulas. According to professional artists interviewed by publications like Allure, issues often start with using too much product at once rather than building up in thin layers.
Finally, shade and placement matter. A bronzer that's too dark or too cool for your skin tone will show every uneven blend. Applying it too low on the cheek, or in a concentrated stripe, emphasizes patchiness instead of creating a soft, diffused warmth. Keeping these causes in mind will guide you toward the right fix instead of piling on more product and making things worse.
Emergency Fixes for Patchy Powder Bronzer
Powder bronzer is still the most widely used format because it's quick and easy, but it also shows patchiness clearly. The good news is that powder is usually the easiest to correct without stripping your base.
If your bronzer looks streaky, harsh, or too intense, start by reaching for a clean, fluffy brush-ideally something slightly larger and softer than the one you used to apply the bronzer. A classic tapered powder brush or duo-fiber face brush works well. Use very light pressure and small circular or back-and-forth motions to diffuse the edges. Think of this as "dry blending": you're redistributing the pigment rather than adding more. Many artists recommend synthetic fibers for this step because they don't grab excess product as aggressively as some natural-hair brushes.
When dry blending isn't enough, a translucent setting powder can act like an "eraser." Load a clean brush with a small amount of translucent powder and sweep it over the patchy area, then gently buff. The extra powder helps soften pigment and smooth transitions. This works especially well if your bronzer has clung to slightly sticky foundation or concealer. Choose a finely milled, non-whitening formula to avoid making the area look chalky.
For bronzer that looks too dark or muddy in a specific spot, a tinted face powder or powder foundation that matches your skin tone can help. Lightly press it over the area with a fluffy brush or a velour puff, then blend the edges. This adds a veil of your true skin shade over the bronzer, dialing down intensity while keeping your base intact. If your bronzer has crept too far down the cheek, this method is useful for "lifting" the cheek area visually, similar to how brightening concealer is used in contour clean-up techniques.
A setting spray can also rescue powder bronzer that looks heavy or cakey. After buffing and softening with translucent powder, mist the face lightly with a makeup setting spray from about an arm's length away, then let it air-dry. The spray helps powders meld into the skin and each other, reducing the powdery look and making blending appear more seamless. Avoid drenching the skin, which can cause streaks; a fine, even mist is what you're aiming for.
How to Fix Patchy Cream or Liquid Bronzer
Cream and liquid bronzers can look beautifully skin-like, but when they go patchy, they often lift foundation or create obvious finger marks. Fixing them requires a slightly different strategy than with powders, especially if your base is already set underneath.
If your cream bronzer looks streaky or has visible brush marks, the first step is to switch tools. A damp makeup sponge is often the most forgiving option for cream products. Using the clean side of the sponge, gently bounce over the bronzer rather than dragging it. This helps press the product into the skin and diffuse harsh lines without disturbing the foundation below. Many artists recommend this stippling motion for any cream complexion product, a technique echoed in guides from brands like NARS and Fenty Beauty.
When a specific area is too intense, resist the urge to pile on more foundation straight away. Instead, tap the damp sponge on the back of your hand to remove excess moisture, then lightly bounce it over the darkest area to lift a small amount of product. If more correction is needed, add a tiny amount of your foundation or tinted moisturizer to the sponge and tap it just on the patchy area, blending out the edges. This creates a thin veil of base over the bronzer, softening it without creating a thick, cakey layer.
If the bronzer has lifted your foundation and left a patch with less coverage, spot-correct rather than stripping the whole cheek. Use a small amount of foundation or concealer on a synthetic brush or fingertip and gently tap it over the bare spot, feathering the edges into the bronzer. Once it sets slightly, you can reapply a very sheer layer of bronzer, ideally by tapping from a palette or your hand rather than applying directly from a stick or wand. This two-step approach minimizes further disruption of the base.
Using a powder bronzer on top of cream can also help salvage an uneven application. Once you have roughly evened out the cream layer, dust a light layer of a sheer powder bronzer in a similar tone over the same areas. This can smooth texture and unify the finish, especially if the cream bronzer looks patchy due to different levels of dewiness across the face. Just ensure your makeup is not overly set with powder first, or the cream may not grip evenly.
When Your Bronzer Is the Wrong Shade or Looks Muddy
Sometimes the bronzer isn't exactly patchy, but it looks off: too orange, too gray, too dark, or just muddy. Correcting this without starting over is mainly about rebalancing color and contrast.
If the shade is too dark, think in terms of dilution, not erasure. A sheer layer of your regular pressed powder or powder foundation over the bronzed areas can bring them closer to your natural skin tone. Use a large, fluffy brush and focus on the center of the bronzed region, then lightly sweep outward to avoid creating a hard line. This technique is similar to how artists soften overdone contour, and it can also help if you've used a bronzer that's more suited to deeper skin tones than your own.
When bronzer pulls orange or overly warm, adding a cooler-toned face powder or neutral blush can balance it. A soft, neutral rose or beige blush applied slightly higher on the cheekbone can visually break up an overly warm bronzer, drawing attention upward and giving the impression of a more nuanced, layered cheek. Beauty editors at outlets like Vogue often emphasize using blush and bronzer together for a more believable warmth, and this same principle works in reverse when something has gone too far.
If things look muddy, it's often because bronzer, contour, blush, and sometimes highlighter have blurred into one large patch of color. To fix this, reintroduce structure. Use a small amount of your skin-tone powder or foundation to lightly "carve out" under the cheekbone, along the sides of the nose, or around the jaw, depending on where the muddiness sits. You're not contouring with a darker shade here; you're bringing back your natural skin tone in strategic strips to create cleaner transitions between products.
In cases where only one side of the face looks off, match the better side instead of trying to completely erase the problematic one. Study which areas have more or less color on the more successful cheek, then use tiny amounts of bronzer, powder, or blush to replicate that balance. This approach is especially helpful if you're working with limited time before leaving the house or heading to an event.
Gentle "Undo" Techniques That Don't Ruin Your Base
Even with the best rescue attempt, sometimes a small area of bronzer needs to be partially removed. The goal is to lift pigment without stripping your foundation or concealer underneath, which can be tricky if you reach straight for makeup remover.
One of the simplest tools for this is a clean, slightly damp cotton bud or pointed cotton swab. Lightly roll it over the area where the bronzer is most intense, using minimal pressure. This can lift a surprising amount of product, especially powders, without dragging the base. If a bit of foundation comes away, tap a tiny amount back in with your fingertip and blend the edge. Avoid saturating the cotton with micellar water or remover unless the situation is truly beyond repair; any liquid will break down the underlying makeup.
A clean makeup sponge can also act as a gentle eraser. Using the bare, dry side of the sponge, press and lift repeatedly over the patchy area. The sponge's texture picks up excess pigment and oils, softening harsh spots. This is similar to how backstage artists fix over-powdered or cakey areas during fashion shows, as documented in behind-the-scenes features from brands like MAC Cosmetics.
If your bronzer has settled into fine lines or pores, especially on textured or oily skin, blotting papers or a thin tissue can help. Press (don't drag) the paper onto the area to absorb excess oils and some pigment. Then lightly dust a bit of translucent powder over the top and re-blend the edges of the bronzer with a fluffy brush. This sequence can make the skin appear smoother and the bronzer more even without heavy layering.
For very stubborn mistakes, a tiny amount of micellar water on a flat synthetic brush can surgically remove pigment. Wipe most of the liquid off on a tissue so the brush is only barely damp, then carefully sweep just where you need to erase. Immediately afterward, tap a bit of foundation into the cleaned area to restore your base. This is more advanced and should be done slowly in good light, but it can save a full face if one streak is truly unfixable by other means.
Fixing Patchy Bronzer on Different Skin Types
Skin type plays a major role in how bronzer behaves. Tailoring your rescue strategy to your skin can make fixes quicker and more effective, and it also informs how you might adjust your routine long term.
On dry or dehydrated skin, bronzer tends to cling to flaky patches and emphasize texture. Midday, it can look uneven as the skin absorbs some of the moisture from cream formulas or as powders settle. To correct this without restarting, focus first on rehydrating the surface. A hydrating facial mist or a fine spritz of a glycerin-based setting spray can lightly re-dampen powders and soften the look of dryness. After misting, give the skin 20-30 seconds, then gently press with a clean sponge to meld products. If flakes are still visible, use a spoolie or clean mascara wand very lightly over the dry areas to lift loose skin, then add a whisper of translucent powder and re-blend bronzer around, not directly on, those spots.
Oily or combination skin often experiences bronzer sliding, separating, or looking patchy as natural oils break through. In this case, blotting is usually the first step. Use oil-absorbing sheets or a thin tissue to remove shine without disturbing the makeup too much. Then, reapply a small amount of powder bronzer only where needed, pressing it in with a brush instead of sweeping. If the bronzer has separated around the nose or on the forehead, a tiny amount of mattifying powder in those areas before re-bronzing can create a fresh, even canvas. Resources from dermatology-focused sites like the American Academy of Dermatology are useful if you're still figuring out how to balance oil control with makeup wear.
For textured or acne-prone skin, bronzer can catch on raised areas or healed marks, making them more noticeable. When patchiness occurs, avoid heavy buffing, which can inflame the skin. Instead, use pressing and patting motions with a sponge or soft brush to redistribute color. If a particular blemish looks too bronzed, tap a tiny bit of concealer or skin-tone powder on top to "mute" it and then blend around the edges. Our health and fitness and wellness sections also explore how skin health and lifestyle can influence makeup performance over time.
Strategic Tools and Products That Make Fixing Easier
Having the right tools on hand can turn a bronzer mishap from a full restart into a 90-second fix. A few categories are particularly useful to keep in your makeup bag or kit.
Soft, fluffy brushes in a range of sizes are essential, especially one clean "rescue" brush you don't use to apply product initially. Duo-fiber brushes, which have a mix of long and short bristles, are excellent for diffusing harsh edges because they pick up and deposit less pigment. Many pro-focused brands and tutorials, including those from Real Techniques and Sigma Beauty, highlight duo-fiber brushes as ideal for sheer, buildable blending.
A reliable translucent setting powder is another workhorse. Look for a finely milled, flashback-free formula from a reputable brand; options from Laura Mercier, Hourglass, and Make Up For Ever are widely referenced by artists and beauty editors. This kind of powder can soften bronzer, set your base, and help re-blend without changing your foundation shade too much. If you prefer a more natural, skin-like finish, a lightly tinted pressed powder or powder foundation can serve a similar role.
A damp makeup sponge, whether a classic teardrop shape or a wedge, is invaluable for both cream and powder fixes. Beyond blending, a sponge can lift excess pigment, press products together, and smooth texture. Many guides, including those from Beautyblender and Sephora's how-to resources, emphasize tapping and bouncing motions rather than dragging, which is particularly important when you're trying not to disturb underlying layers.
Finally, a good setting spray can act as a finishing step after corrections. Look for formulas that suit your skin type-hydrating for dry skin, oil-controlling for oily types. Sprays from brands like Urban Decay, NYX, and Charlotte Tilbury are often cited in beauty media for helping powders meld into the skin, which indirectly improves how bronzer appears after you've adjusted it. Just remember that setting spray is more of a finisher than a primary fixer; it works best after you've already rebalanced the bronzer with brushes, powders, or sponges.
Preventing Patchy Bronzer Next Time
Rescue techniques are helpful, but prevention makes your routine smoother and faster. A few adjustments to skin prep, formula choice, and application order can dramatically reduce the risk of patchiness.
Consistent skin prep is foundational. Lightly exfoliated, well-moisturized skin will always take bronzer more evenly. Incorporating gentle chemical exfoliants-such as lactic or mandelic acid-once or twice a week, as recommended by dermatologists and organizations like the American Academy of Dermatology, can help reduce dry patches that grab pigment. Give your moisturizer and sunscreen time to absorb fully before makeup; excess slip under foundation can make everything on top move unpredictably.
Matching formulas also matters. A general rule: powder on powder, cream on cream. If you're using a cream or liquid foundation and want to apply powder bronzer, lightly set your base with a translucent or sheer powder first so the bronzer glides instead of clinging. If you love cream bronzer, apply it before heavy powdering, ideally right after your foundation or tinted moisturizer. Our guides and tips often return to this principle of layering like with like to keep textures harmonious.
Application technique can make or break the result. Start with a small amount of bronzer and build in thin layers rather than trying to achieve full warmth in one swipe. Apply where the sun would naturally hit-top of the forehead, bridge of the nose, high points of the cheeks-rather than creating a thick band under the cheekbone. Many pro artists, including those interviewed by Into The Gloss, recommend holding your brush closer to the end of the handle to reduce pressure, which automatically softens the effect.
Choosing the right shade is also crucial for a non-patchy, believable result. For most people, one to two shades deeper than their natural skin tone, with a neutral to slightly warm undertone, works best. Very cool or ashy bronzers are better suited to contouring than to adding all-over warmth and can look streaky if used too broadly. Swatching bronzers on the chest or neck, as suggested in many beauty tutorials, can help ensure harmony with your overall coloring rather than just the face.
Finally, consider your environment and wear time. In hot, humid weather, a long-wear or waterproof base with light layers of powder bronzer may hold up better, while in cold, dry climates, cream bronzers over well-hydrated skin can look more natural and less flaky. Our trends and brands and products coverage frequently highlight newer formulas designed for specific climates and skin types, which can make a noticeable difference in how evenly bronzer wears throughout the day.
Knowing When to Start Over (And How to Do It Strategically)
There will be rare moments when bronzer is so uneven, the base so disrupted, or the shade so mismatched that starting over is the most efficient option. The key is not necessarily to remove every trace of makeup, but to reset only what's necessary.
If the problem is localized-say, just one cheek or the forehead-use a micellar water-soaked cotton pad folded into a neat edge to remove makeup from that area alone. Then reapply moisturizer or a bit of primer, followed by foundation and bronzer, blending slightly into the untouched sections to avoid lines of demarcation. This targeted reset often takes less time than repeatedly trying to correct a badly botched application.
When the entire complexion feels off, you can still salvage eye and lip makeup by avoiding those areas during removal. Use gentle, fragrance-free removers recommended by dermatologists and organizations like the National Eczema Association if your skin is sensitive, then rebuild your base with lighter layers and more careful bronzer placement. Think of it as a chance to refine your technique rather than a failure; every misstep teaches you something about your products and your skin.
Over time, you may find that you need rescue techniques less often as you adjust your prep, tools, and product choices. Keeping a few core principles in mind-thin layers, compatible textures, appropriate shades, and a light hand-goes a long way toward bronzer that looks smooth, natural, and flattering, with or without last-minute fixes.
